

Monday, March 29, 2010


Tuesday, March 23, 2010

Wednesday, November 19, 2008
Philosophy of Art Education
Through art education, students discover and use a set of problem solving skills rarely used in regular academic classes. Children learn to experiment and improvise in order to achieve their goals. This ability to adapt and accept will allow children to live with tolerance and gain a better understanding of other people. Art should build confidence not create differences. As an art teacher, I believe it is important to create curricula that is diverse and can reach each student’s abilities. Since art, more that any other subject, is about self-expression, it is critical that each lesson can be adapted to meet each student’s needs.
Saturday, November 15, 2008
Pop Up Origami
Origami (pronounced or-i-GA-me) is the Japanese art of folding paper into shapes and objects. “Ori” is the Japanese word for folding and “kami” is the Japanese word for paper. Origami actually began in China in the first or second century, and it spread to Japan during the sixth century. When origami first began, there was very little paper, so only the rich could afford to do paper folding. The Japanese found useful purposes for their origami models. While today origami is considered a craft, initially, it was for formal functions. Now that paper is less expensive origami is for everyone, rich and poor. Even though today paper is so plentiful, the Japanese have always been careful not to waste anything, even the tiniest scrap of paper can be used for folding.
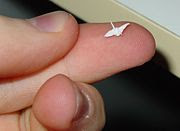
For centuries there were no written directions for folding origami objects. Directions were handed down from one generation to the next, making origami a very important part of the Japanese people’s cultural heritage. In 1797, however, How to Fold 1000 Cranes was published containing the first written set of origami instructions. The Japanese crane, a sacred bird, is one of the most famous origami designs. The origami crane has become an international symbol for peace and hope. There is a legend that says that anyone who folds one thousand paper cranes will be granted one wish. Today people still use origami objects to symbolize a cause, such as the Origami Whales Project to save the whales.
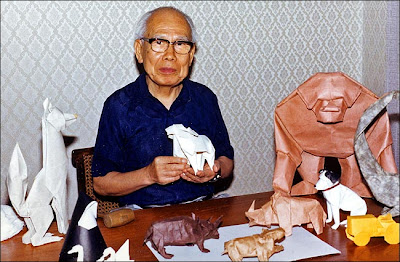
Today master paperfolders can be found all over the world, not just in Japan or China. Akira Yoshizawa of Japan is a modern paperfolding master. He has developed a set of symbols and terms that are used worldwide in the written instructions of origami. He is considered the “father of modern origami” due to his creative paperfolding.


Here are a few good Origami links:
http://library.thinkquest.org/5402/index.html
http://www.origami-usa.org/
http://origami.iap-peacetree.org/main.php?lang=1&style=1
http://en.wikipedia.org/wiki/Origami_tech_tree - Good visuals.
http://www.origamiwithrachelkatz.com/folding/symbols.htm - Good illustrated instructions.
http://www.origami-resource-center.com/edible-origami.html
1.6 Speaking and Listening
2.9 Geometry
9.1 Production and Exhibition of Visual Arts
9.2 Historical and Cultural Contexts
9.3 Aesthetic Response
Goal:
Students will learn some basic origami folds and use them to create a unique composition, using warm and cool colors and a focal point.
Objectives: Students will:
1. Understand the culture of the Japanese and origami.
2. Learn origami techniques, specifically the blintz base and the helmet base.
3. Use warm and cool colors to create a composition.
4. Learn how to find the center of the page and create a focal point.
5. Learn about symmetry and use it to create a unique composition.
6. Create a stackable origami composition.
Requirements:
Students will create origami clusters using the blintz base and the helmet base using only warm or cool colors for each. The finished blintz and helmet bases will be stacked inside each other (respectively) and then arranged to make a unique composition including a focal point.
Resource Materials/Visual Aids:
Origami books
Origami Directions Worksheet
Origami Teaching board
• Exemplar
• Step-by-step instructions for each base
• Examples of origami, historical and current
Materials:
- 9” x 9” black paper
- 3” squares of various colors
- Glue
Teacher Preparation: Teacher will:
• Research origami.
• Create a teaching board with exemplar and instructions.
• Create a worksheet students can use a guide.
Introduction to Lesson:
Teacher will go over history of origami and origami today showing examples. Teacher will then go over how to create a blintz base and a helmet base. After the basic bases are complete, show the students how to add interest by folding certain parts. Remind the students what warm and cool colors are, and teach them about focal points.
Directions:
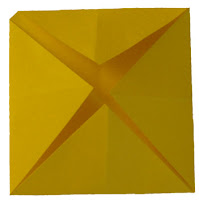
The Blintz Base:
1. Fold on diagonal, bringing corners together exactly. Unfold.
2. Fold on other diagonal, bringing corners together exactly. Unfold.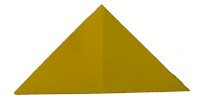
3. Fold corners into center.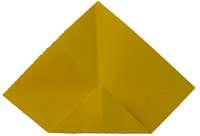
4. Stack 3 or 4 inside each other, be sure that they are all warm OR cool colors.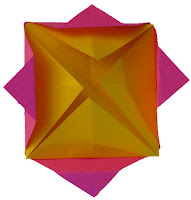
The Helmet Base:
5. Fold on diagonal, bringing corners together exactly.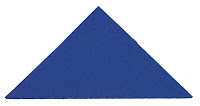
6. Fold corners to top.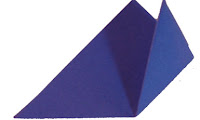
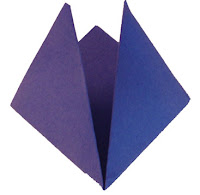
7. Stack 3 or 4 inside each other – be sure that they are all warm OR cool colors.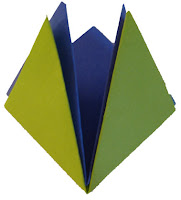
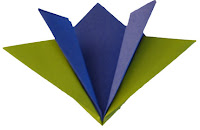
8. Add interest to your clusters by folding down certain parts and not others.
9. Make sure one of your clusters stands out as your focal point.
10. Find the middle of the 9” square and glue down your focal point cluster.
11. Arrange the rest of the clusters on the 9” square paper and glue.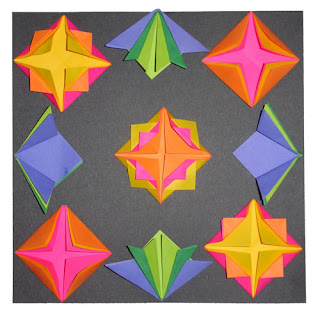
Closure:
Place composition in an area to dry and clean up work area.
Critique/Evaluation/Assessment:
We will display the students’ finished compositions and discuss how each quilt is different despite everyone using the same bases.
Extensions:
Early finishers may create more clusters for another composition. Now that they know how their composition turned out they may have more ideas of how to add interest to teach cluster. The student may also look in the origami books for more ideas of bases or objects they would like to include in another composition. Students may also play with paper and paper-folding to see if they can come up their own folding designs and or bases.
Time Allotment:
Introduction: 15 minutes
Work Time: 25 minutes
Closure/Discussion: 5 minutes
Vocabulary:
Origami: The ancient Japanese art of paper folding.
Blintz Base: Preliminary Base – many origami models use this base as a starting point.
Helmet Base: Preliminary Base – many origami models use this base as a starting point.
Symmetry: Correspondence in size, shape, and relative position of parts on opposite sides of a dividing line or about a center axis.
Focal Point: The central or principle point of focus.
Composition: The plan, placement, or arrangement of the elements of art in a work.
Negative Space: The space around and between the subjects of an image.
Warm Colors: Reds, Oranges, and Yellows.
Cool Colors: Greens, Blues, and Purples.
Safety Concerns: N/A
Bibliography/References:
Pieces and creases: A fun guide to origami. (1999). ThinkQuest. Retrieved October 23,
2008, from http://library.thinkquest.org/5402/index.html.
Sturm, G. (2008) Origami for everyone. Retrieved October 23, 2008, from
http://origami.iap-peacetree.org/main.php?lang=1&style=1.
Takahama, T. (1985). The Joy of Origami. Tokyo, Japan: Shufunotomo Co., Ltd.


For centuries there were no written directions for folding origami objects. Directions were handed down from one generation to the next, making origami a very important part of the Japanese people’s cultural heritage. In 1797, however, How to Fold 1000 Cranes was published containing the first written set of origami instructions. The Japanese crane, a sacred bird, is one of the most famous origami designs. The origami crane has become an international symbol for peace and hope. There is a legend that says that anyone who folds one thousand paper cranes will be granted one wish. Today people still use origami objects to symbolize a cause, such as the Origami Whales Project to save the whales.

Today master paperfolders can be found all over the world, not just in Japan or China. Akira Yoshizawa of Japan is a modern paperfolding master. He has developed a set of symbols and terms that are used worldwide in the written instructions of origami. He is considered the “father of modern origami” due to his creative paperfolding.
Here are a few good Origami links:
http://library.thinkquest.org/5402/index.html
http://www.origami-usa.org/
http://origami.iap-peacetree.org/main.php?lang=1&style=1
http://en.wikipedia.org/wiki/Origami_tech_tree - Good visuals.
http://www.origamiwithrachelkatz.com/folding/symbols.htm - Good illustrated instructions.
http://www.origami-resource-center.com/edible-origami.html
Pop-Up Origami Lesson
P.A. Academic Standards:1.6 Speaking and Listening
2.9 Geometry
9.1 Production and Exhibition of Visual Arts
9.2 Historical and Cultural Contexts
9.3 Aesthetic Response
Goal:
Students will learn some basic origami folds and use them to create a unique composition, using warm and cool colors and a focal point.
Objectives: Students will:
1. Understand the culture of the Japanese and origami.
2. Learn origami techniques, specifically the blintz base and the helmet base.
3. Use warm and cool colors to create a composition.
4. Learn how to find the center of the page and create a focal point.
5. Learn about symmetry and use it to create a unique composition.
6. Create a stackable origami composition.
Requirements:
Students will create origami clusters using the blintz base and the helmet base using only warm or cool colors for each. The finished blintz and helmet bases will be stacked inside each other (respectively) and then arranged to make a unique composition including a focal point.
Resource Materials/Visual Aids:
Origami books
Origami Directions Worksheet
Origami Teaching board
• Exemplar
• Step-by-step instructions for each base
• Examples of origami, historical and current
Materials:
- 9” x 9” black paper
- 3” squares of various colors
- Glue
Teacher Preparation: Teacher will:
• Research origami.
• Create a teaching board with exemplar and instructions.
• Create a worksheet students can use a guide.
Introduction to Lesson:
Teacher will go over history of origami and origami today showing examples. Teacher will then go over how to create a blintz base and a helmet base. After the basic bases are complete, show the students how to add interest by folding certain parts. Remind the students what warm and cool colors are, and teach them about focal points.
Directions:
The Blintz Base:
1. Fold on diagonal, bringing corners together exactly. Unfold.

2. Fold on other diagonal, bringing corners together exactly. Unfold.

3. Fold corners into center.


4. Stack 3 or 4 inside each other, be sure that they are all warm OR cool colors.

The Helmet Base:
5. Fold on diagonal, bringing corners together exactly.

6. Fold corners to top.


7. Stack 3 or 4 inside each other – be sure that they are all warm OR cool colors.


8. Add interest to your clusters by folding down certain parts and not others.
9. Make sure one of your clusters stands out as your focal point.
10. Find the middle of the 9” square and glue down your focal point cluster.
11. Arrange the rest of the clusters on the 9” square paper and glue.

Closure:
Place composition in an area to dry and clean up work area.
Critique/Evaluation/Assessment:
We will display the students’ finished compositions and discuss how each quilt is different despite everyone using the same bases.
Extensions:
Early finishers may create more clusters for another composition. Now that they know how their composition turned out they may have more ideas of how to add interest to teach cluster. The student may also look in the origami books for more ideas of bases or objects they would like to include in another composition. Students may also play with paper and paper-folding to see if they can come up their own folding designs and or bases.
Time Allotment:
Introduction: 15 minutes
Work Time: 25 minutes
Closure/Discussion: 5 minutes
Vocabulary:
Origami: The ancient Japanese art of paper folding.
Blintz Base: Preliminary Base – many origami models use this base as a starting point.
Helmet Base: Preliminary Base – many origami models use this base as a starting point.
Symmetry: Correspondence in size, shape, and relative position of parts on opposite sides of a dividing line or about a center axis.
Focal Point: The central or principle point of focus.
Composition: The plan, placement, or arrangement of the elements of art in a work.
Negative Space: The space around and between the subjects of an image.
Warm Colors: Reds, Oranges, and Yellows.
Cool Colors: Greens, Blues, and Purples.
Safety Concerns: N/A
Bibliography/References:
Pieces and creases: A fun guide to origami. (1999). ThinkQuest. Retrieved October 23,
2008, from http://library.thinkquest.org/5402/index.html.
Sturm, G. (2008) Origami for everyone. Retrieved October 23, 2008, from
http://origami.iap-peacetree.org/main.php?lang=1&style=1.
Takahama, T. (1985). The Joy of Origami. Tokyo, Japan: Shufunotomo Co., Ltd.
Thursday, November 13, 2008
WebQuest
Art in Advertising - A WebQuest for Grade 8 - 10
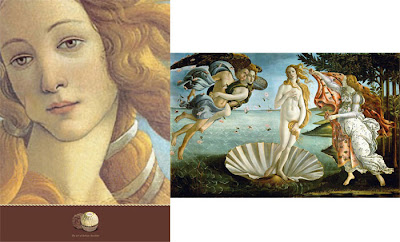
Credits: (left) Ferrero Rocher (Chocolate) advertisement (right) Sandro Botticelli, The Birth of Venus, 1482 -1486
Introduction
In this electronic age, people are more likely to recognize a work of art from an advertisement rather than from an art class or a museum. We are flooded with and influenced by such images everyday; on television, the Internet, billboards, store windows, and even the sides of buses. It is important to understand how advertisers use appropriated images to sell their products.
This WebQuest will get students thinking about the images they see everyday. They will give some thought to Visual Culture and art-inspired advertisements by answering questions, looking at images, and creating their own advertisement.
For this WebQuest you will need Photoshop and web access.
Task
 Credits: (left)Pantene Advertisement (right)Leonardo da Vinci, Mona Lisa, 1503 - 1506
In this WebQuest you will look at art-inspired advertisements and learn about appropriation in art. You will be introduced to appropriation as it applies to contemporary art and visual culture, and how it affects your own art.
Process
Please answer the following questions in a new Word Document.
Save as - your last name_artadvertisement.
1. Take a minute to look at these art-inspired advertisements.
a. Have you ever seen any of these advertisements before? If so, which one(s)?
b. Have you ever seen the artwork before? If so, which one(s)?
c. Choose one of these advertisements and discuss why you think the company choose that particular work of art to promote their product. Is the advertisement successful? Do the product and the artwork relate to one another?
2. What is appropriation?
a. Do you use appropriation in your artwork?
b. Do you think it is okay to use someone else's artwork in your own?
c. Do you think appropriation is just a fancy word copying work, or even stealing work? When is appropriation acceptable, and when is it not?
3. Create your own art-inspired advertisement.
- Select a painting and a product or service you want to use for your own advertisement.
- Which do you pick first, the painting or the product?
- You are not limited to only painters, you may also use illustrators, sculptors, or any other kind of artist you want. DO NOT use anyone born AFTER 1900. If you are having trouble coming up with an artist's work, click here.
- If you are having trouble thinking of a product here are a few thoughts: What is your favorite snack, gum, brand of clothing, coffee, candy, etc... What products do you use when you wake up in the morning; toothpaste, cereal, soap, shampoo, etc...
- Once you have decided upon the images you will be using, use Photoshop to create your own collaged advertisement. Use the manipulation tools to create the collage. You may combine images, crop, paste, play with levels, etc... Stay true to the art image and try to blend the product in as if it is a part of the artist's original idea.
- Save the image as a .jpg file, no larger than 8MB, on the desktop, and BACK IT UP ON YOUR OWN PERSONAL DRIVE. Save as - your last name_artadvertisement."
- Document any images used in the making of your final image.
Students will be graded on:
- Fulfillment of requirements
- Creativity
- Content
- Quality of collage
In the same Word Document you started earlier, write a short paragraph about why you chose the images you chose. Do the images relate to one another? Does the artwork you chose help to sell the product, if so how?
References
All references are used for educational purposes.
http://pzrservices.typepad.com/advertisingisgoodforyou/artinspired_advertising/
Subscribe to:
Posts (Atom)
