
Wednesday, November 19, 2008
Philosophy of Art Education
Through art education, students discover and use a set of problem solving skills rarely used in regular academic classes. Children learn to experiment and improvise in order to achieve their goals. This ability to adapt and accept will allow children to live with tolerance and gain a better understanding of other people. Art should build confidence not create differences. As an art teacher, I believe it is important to create curricula that is diverse and can reach each student’s abilities. Since art, more that any other subject, is about self-expression, it is critical that each lesson can be adapted to meet each student’s needs.
Saturday, November 15, 2008
Pop Up Origami
Origami (pronounced or-i-GA-me) is the Japanese art of folding paper into shapes and objects. “Ori” is the Japanese word for folding and “kami” is the Japanese word for paper. Origami actually began in China in the first or second century, and it spread to Japan during the sixth century. When origami first began, there was very little paper, so only the rich could afford to do paper folding. The Japanese found useful purposes for their origami models. While today origami is considered a craft, initially, it was for formal functions. Now that paper is less expensive origami is for everyone, rich and poor. Even though today paper is so plentiful, the Japanese have always been careful not to waste anything, even the tiniest scrap of paper can be used for folding.
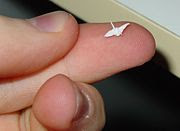
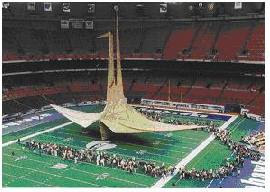
For centuries there were no written directions for folding origami objects. Directions were handed down from one generation to the next, making origami a very important part of the Japanese people’s cultural heritage. In 1797, however, How to Fold 1000 Cranes was published containing the first written set of origami instructions. The Japanese crane, a sacred bird, is one of the most famous origami designs. The origami crane has become an international symbol for peace and hope. There is a legend that says that anyone who folds one thousand paper cranes will be granted one wish. Today people still use origami objects to symbolize a cause, such as the Origami Whales Project to save the whales.
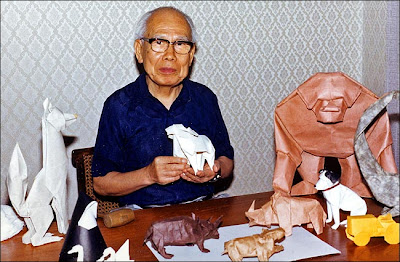
Today master paperfolders can be found all over the world, not just in Japan or China. Akira Yoshizawa of Japan is a modern paperfolding master. He has developed a set of symbols and terms that are used worldwide in the written instructions of origami. He is considered the “father of modern origami” due to his creative paperfolding.


Here are a few good Origami links:
http://library.thinkquest.org/5402/index.html
http://www.origami-usa.org/
http://origami.iap-peacetree.org/main.php?lang=1&style=1
http://en.wikipedia.org/wiki/Origami_tech_tree - Good visuals.
http://www.origamiwithrachelkatz.com/folding/symbols.htm - Good illustrated instructions.
http://www.origami-resource-center.com/edible-origami.html
1.6 Speaking and Listening
2.9 Geometry
9.1 Production and Exhibition of Visual Arts
9.2 Historical and Cultural Contexts
9.3 Aesthetic Response
Goal:
Students will learn some basic origami folds and use them to create a unique composition, using warm and cool colors and a focal point.
Objectives: Students will:
1. Understand the culture of the Japanese and origami.
2. Learn origami techniques, specifically the blintz base and the helmet base.
3. Use warm and cool colors to create a composition.
4. Learn how to find the center of the page and create a focal point.
5. Learn about symmetry and use it to create a unique composition.
6. Create a stackable origami composition.
Requirements:
Students will create origami clusters using the blintz base and the helmet base using only warm or cool colors for each. The finished blintz and helmet bases will be stacked inside each other (respectively) and then arranged to make a unique composition including a focal point.
Resource Materials/Visual Aids:
Origami books
Origami Directions Worksheet
Origami Teaching board
• Exemplar
• Step-by-step instructions for each base
• Examples of origami, historical and current
Materials:
- 9” x 9” black paper
- 3” squares of various colors
- Glue
Teacher Preparation: Teacher will:
• Research origami.
• Create a teaching board with exemplar and instructions.
• Create a worksheet students can use a guide.
Introduction to Lesson:
Teacher will go over history of origami and origami today showing examples. Teacher will then go over how to create a blintz base and a helmet base. After the basic bases are complete, show the students how to add interest by folding certain parts. Remind the students what warm and cool colors are, and teach them about focal points.
Directions:
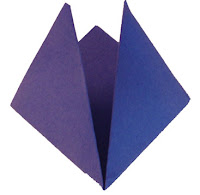
The Blintz Base:
1. Fold on diagonal, bringing corners together exactly. Unfold.
2. Fold on other diagonal, bringing corners together exactly. Unfold.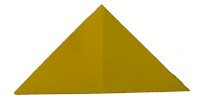
3. Fold corners into center.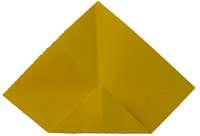
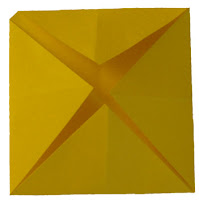
4. Stack 3 or 4 inside each other, be sure that they are all warm OR cool colors.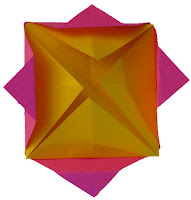
The Helmet Base:
5. Fold on diagonal, bringing corners together exactly.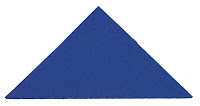
6. Fold corners to top.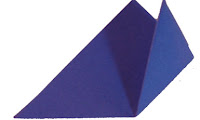
7. Stack 3 or 4 inside each other – be sure that they are all warm OR cool colors.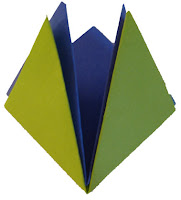
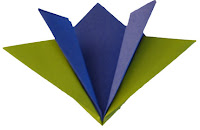
8. Add interest to your clusters by folding down certain parts and not others.
9. Make sure one of your clusters stands out as your focal point.
10. Find the middle of the 9” square and glue down your focal point cluster.
11. Arrange the rest of the clusters on the 9” square paper and glue.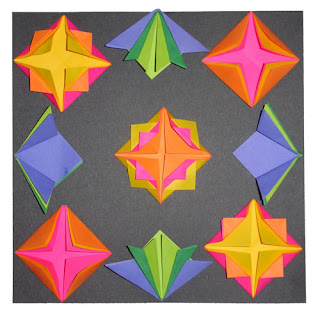
Closure:
Place composition in an area to dry and clean up work area.
Critique/Evaluation/Assessment:
We will display the students’ finished compositions and discuss how each quilt is different despite everyone using the same bases.
Extensions:
Early finishers may create more clusters for another composition. Now that they know how their composition turned out they may have more ideas of how to add interest to teach cluster. The student may also look in the origami books for more ideas of bases or objects they would like to include in another composition. Students may also play with paper and paper-folding to see if they can come up their own folding designs and or bases.
Time Allotment:
Introduction: 15 minutes
Work Time: 25 minutes
Closure/Discussion: 5 minutes
Vocabulary:
Origami: The ancient Japanese art of paper folding.
Blintz Base: Preliminary Base – many origami models use this base as a starting point.
Helmet Base: Preliminary Base – many origami models use this base as a starting point.
Symmetry: Correspondence in size, shape, and relative position of parts on opposite sides of a dividing line or about a center axis.
Focal Point: The central or principle point of focus.
Composition: The plan, placement, or arrangement of the elements of art in a work.
Negative Space: The space around and between the subjects of an image.
Warm Colors: Reds, Oranges, and Yellows.
Cool Colors: Greens, Blues, and Purples.
Safety Concerns: N/A
Bibliography/References:
Pieces and creases: A fun guide to origami. (1999). ThinkQuest. Retrieved October 23,
2008, from http://library.thinkquest.org/5402/index.html.
Sturm, G. (2008) Origami for everyone. Retrieved October 23, 2008, from
http://origami.iap-peacetree.org/main.php?lang=1&style=1.
Takahama, T. (1985). The Joy of Origami. Tokyo, Japan: Shufunotomo Co., Ltd.


For centuries there were no written directions for folding origami objects. Directions were handed down from one generation to the next, making origami a very important part of the Japanese people’s cultural heritage. In 1797, however, How to Fold 1000 Cranes was published containing the first written set of origami instructions. The Japanese crane, a sacred bird, is one of the most famous origami designs. The origami crane has become an international symbol for peace and hope. There is a legend that says that anyone who folds one thousand paper cranes will be granted one wish. Today people still use origami objects to symbolize a cause, such as the Origami Whales Project to save the whales.

Today master paperfolders can be found all over the world, not just in Japan or China. Akira Yoshizawa of Japan is a modern paperfolding master. He has developed a set of symbols and terms that are used worldwide in the written instructions of origami. He is considered the “father of modern origami” due to his creative paperfolding.
Here are a few good Origami links:
http://library.thinkquest.org/5402/index.html
http://www.origami-usa.org/
http://origami.iap-peacetree.org/main.php?lang=1&style=1
http://en.wikipedia.org/wiki/Origami_tech_tree - Good visuals.
http://www.origamiwithrachelkatz.com/folding/symbols.htm - Good illustrated instructions.
http://www.origami-resource-center.com/edible-origami.html
Pop-Up Origami Lesson
P.A. Academic Standards:1.6 Speaking and Listening
2.9 Geometry
9.1 Production and Exhibition of Visual Arts
9.2 Historical and Cultural Contexts
9.3 Aesthetic Response
Goal:
Students will learn some basic origami folds and use them to create a unique composition, using warm and cool colors and a focal point.
Objectives: Students will:
1. Understand the culture of the Japanese and origami.
2. Learn origami techniques, specifically the blintz base and the helmet base.
3. Use warm and cool colors to create a composition.
4. Learn how to find the center of the page and create a focal point.
5. Learn about symmetry and use it to create a unique composition.
6. Create a stackable origami composition.
Requirements:
Students will create origami clusters using the blintz base and the helmet base using only warm or cool colors for each. The finished blintz and helmet bases will be stacked inside each other (respectively) and then arranged to make a unique composition including a focal point.
Resource Materials/Visual Aids:
Origami books
Origami Directions Worksheet
Origami Teaching board
• Exemplar
• Step-by-step instructions for each base
• Examples of origami, historical and current
Materials:
- 9” x 9” black paper
- 3” squares of various colors
- Glue
Teacher Preparation: Teacher will:
• Research origami.
• Create a teaching board with exemplar and instructions.
• Create a worksheet students can use a guide.
Introduction to Lesson:
Teacher will go over history of origami and origami today showing examples. Teacher will then go over how to create a blintz base and a helmet base. After the basic bases are complete, show the students how to add interest by folding certain parts. Remind the students what warm and cool colors are, and teach them about focal points.
Directions:
The Blintz Base:
1. Fold on diagonal, bringing corners together exactly. Unfold.

2. Fold on other diagonal, bringing corners together exactly. Unfold.

3. Fold corners into center.


4. Stack 3 or 4 inside each other, be sure that they are all warm OR cool colors.

The Helmet Base:
5. Fold on diagonal, bringing corners together exactly.

6. Fold corners to top.


7. Stack 3 or 4 inside each other – be sure that they are all warm OR cool colors.


8. Add interest to your clusters by folding down certain parts and not others.
9. Make sure one of your clusters stands out as your focal point.
10. Find the middle of the 9” square and glue down your focal point cluster.
11. Arrange the rest of the clusters on the 9” square paper and glue.

Closure:
Place composition in an area to dry and clean up work area.
Critique/Evaluation/Assessment:
We will display the students’ finished compositions and discuss how each quilt is different despite everyone using the same bases.
Extensions:
Early finishers may create more clusters for another composition. Now that they know how their composition turned out they may have more ideas of how to add interest to teach cluster. The student may also look in the origami books for more ideas of bases or objects they would like to include in another composition. Students may also play with paper and paper-folding to see if they can come up their own folding designs and or bases.
Time Allotment:
Introduction: 15 minutes
Work Time: 25 minutes
Closure/Discussion: 5 minutes
Vocabulary:
Origami: The ancient Japanese art of paper folding.
Blintz Base: Preliminary Base – many origami models use this base as a starting point.
Helmet Base: Preliminary Base – many origami models use this base as a starting point.
Symmetry: Correspondence in size, shape, and relative position of parts on opposite sides of a dividing line or about a center axis.
Focal Point: The central or principle point of focus.
Composition: The plan, placement, or arrangement of the elements of art in a work.
Negative Space: The space around and between the subjects of an image.
Warm Colors: Reds, Oranges, and Yellows.
Cool Colors: Greens, Blues, and Purples.
Safety Concerns: N/A
Bibliography/References:
Pieces and creases: A fun guide to origami. (1999). ThinkQuest. Retrieved October 23,
2008, from http://library.thinkquest.org/5402/index.html.
Sturm, G. (2008) Origami for everyone. Retrieved October 23, 2008, from
http://origami.iap-peacetree.org/main.php?lang=1&style=1.
Takahama, T. (1985). The Joy of Origami. Tokyo, Japan: Shufunotomo Co., Ltd.
Thursday, November 13, 2008
WebQuest
Art in Advertising - A WebQuest for Grade 8 - 10
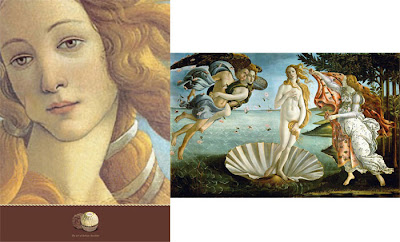
Credits: (left) Ferrero Rocher (Chocolate) advertisement (right) Sandro Botticelli, The Birth of Venus, 1482 -1486
Introduction
In this electronic age, people are more likely to recognize a work of art from an advertisement rather than from an art class or a museum. We are flooded with and influenced by such images everyday; on television, the Internet, billboards, store windows, and even the sides of buses. It is important to understand how advertisers use appropriated images to sell their products.
This WebQuest will get students thinking about the images they see everyday. They will give some thought to Visual Culture and art-inspired advertisements by answering questions, looking at images, and creating their own advertisement.
For this WebQuest you will need Photoshop and web access.
Task
 Credits: (left)Pantene Advertisement (right)Leonardo da Vinci, Mona Lisa, 1503 - 1506
In this WebQuest you will look at art-inspired advertisements and learn about appropriation in art. You will be introduced to appropriation as it applies to contemporary art and visual culture, and how it affects your own art.
Process
Please answer the following questions in a new Word Document.
Save as - your last name_artadvertisement.
1. Take a minute to look at these art-inspired advertisements.
a. Have you ever seen any of these advertisements before? If so, which one(s)?
b. Have you ever seen the artwork before? If so, which one(s)?
c. Choose one of these advertisements and discuss why you think the company choose that particular work of art to promote their product. Is the advertisement successful? Do the product and the artwork relate to one another?
2. What is appropriation?
a. Do you use appropriation in your artwork?
b. Do you think it is okay to use someone else's artwork in your own?
c. Do you think appropriation is just a fancy word copying work, or even stealing work? When is appropriation acceptable, and when is it not?
3. Create your own art-inspired advertisement.
- Select a painting and a product or service you want to use for your own advertisement.
- Which do you pick first, the painting or the product?
- You are not limited to only painters, you may also use illustrators, sculptors, or any other kind of artist you want. DO NOT use anyone born AFTER 1900. If you are having trouble coming up with an artist's work, click here.
- If you are having trouble thinking of a product here are a few thoughts: What is your favorite snack, gum, brand of clothing, coffee, candy, etc... What products do you use when you wake up in the morning; toothpaste, cereal, soap, shampoo, etc...
- Once you have decided upon the images you will be using, use Photoshop to create your own collaged advertisement. Use the manipulation tools to create the collage. You may combine images, crop, paste, play with levels, etc... Stay true to the art image and try to blend the product in as if it is a part of the artist's original idea.
- Save the image as a .jpg file, no larger than 8MB, on the desktop, and BACK IT UP ON YOUR OWN PERSONAL DRIVE. Save as - your last name_artadvertisement."
- Document any images used in the making of your final image.
Students will be graded on:
- Fulfillment of requirements
- Creativity
- Content
- Quality of collage
In the same Word Document you started earlier, write a short paragraph about why you chose the images you chose. Do the images relate to one another? Does the artwork you chose help to sell the product, if so how?
References
All references are used for educational purposes.
http://pzrservices.typepad.com/advertisingisgoodforyou/artinspired_advertising/
Wednesday, November 12, 2008


Monday, November 10, 2008
Wish You Were Here
Lesson Title: Wish You Were Here
Grade Level: 7th

Brief History:
Famous for his photography, William Wegman also does paintings and drawings. Using humor and imagination, Wegman’s paintings integrate individual postcards into larger pictorial scenes. He develops and elaborates upon a detail from one postcard and connects it to the next. His work takes on a dreamlike quality, similar to that found in Surrealism. In what at first appears uncomplicated, he weaves the familiar with the strange and leaves the viewer very unsure of his or her location.
NETS:
1.b – Create original works as a means of personal or group expression.
3. b – Locate, organize, analyze, evaluate, synthesize, and ethically use information from
a variety of sources and media.
6.a – Understand and use technology systems and applications.
6.d – Transfer current knowledge to learning of new technologies.
Goal:
Students will create a work about their home, or a very special place, that begins with an initial collaged element.
Objectives: Students will:
1. Learn about William Wegman and his artwork.
2. Understand and use collage to make a composition that is layered and balanced.
3. Use technology to create their compostion, i.e., computer, scanner, photoshop, digital
images, etc.
4. Understand how to attach final image to the class blog.
5. Create a collaged composition about their home or a very special place.
Requirements:
After learning about William Wegman and visiting some of his online galleries, students will create a work about their home that begins with an initial collaged element, such as a postcard, object, drawing, text, etc. Using traditional or digital media, students will expand and develop a composition to communicate to others the sense and spirit of their special place.
Resource Materials/Visual Aids:
• Sperone Westwater 2006
• Texas Gallery 2005
• CMCA 2008
Materials:
- Computer
- Scanner
- Any resource materials necessary to collect images, i.e., books, magazines, paintings, digital images, etc.
Teacher Preparation: Teacher will:
• Research William Wegman and find links for students to look at his work.
• Create clear instructions for students with an exemplar and resources for more examples.
Introduction to Lesson:
Teacher will introduce William Wegman’s work to the class. Students will become familiar with all of Wegman’s work, but specifically his collaged paintings. Teacher will show exemplar and describe the methods used to create the work. Teacher will suggest many different ways in which this project can be addressed; photography, drawing, painting, Photoshop, etc. Teacher should go over copyright laws and image appropriation.
Directions:
1. Collect images to be used in composition.
2. If images are not already on the computer scan them in.
3. Using many different images and elements create a collaged composition.
4. Put last name in title of document.
Closure:
Save all work. Be sure last name is in the title of any document. If possible, back up on a removable hard drive.
Critique/Evaluation/Assessment:
Post images to class blog along with a short description of work.
Extensions:
Early finishers can add figures to their landscape; self, family, friends, fantastical creatures…
Time Allotment:
Introduction: 15 minutes
Work Time: 25 minutes
Closure/Discussion: 5 minutes
Vocabulary:
William Wegman – Famous photographer, also does painting and drawing.
Safety Concerns:
Whenever doing assignments on the Internet it is always important to warn students about possible dangers of the Web. Be sure to go over copyright laws regarding image appropriation.
Bibliography/References:
William Wegman: New and improved altered photographs, postcard
collages and paintings. Sperone Westwater. Retrieved September 24, 2008 from
http://www.artnet.com/Galleries/Exhibitions.asp?gid=1006&cid=99138
William Wegman: New paintings. Texas Gallery. Retrieved September 24, 2008 from
http://www.texgal.com/Wegman2005/index.htm
William Wegman: Paintings and drawings. Center for Maine Contemporary Art.
Retrieved September 24, 2008 from http://www.cmcanow.org/exhibitions.php?id=45
Sunday, November 9, 2008
Bosched Creatures
Grade Level: 5th
Brief History:
Hieronymus Bosch (1453 – 1516) was a painter who leaves behind more questions than paintings. Bosch introduced a new vision to painting – not a new style, or technique, or school of art – but a new vision.
Bosch was born and died in what is now the Netherlands, during the Middle Ages and a volatile time for Christianity. In some ways, Bosch was an old-fashioned painter, making use of the standard religious themes of his day, but only after removing everything in them that smacked of the predictable. He was a true innovator who would continue to inspire the geniuses of the centuries to come. Some historians see Bosch as a proto-type medieval Surrealist, and parallels are often made with the 20th century Spanish painter Salvador Dali.
 Hieronymus Bosch, The Garden of Earthly Delights, 1503 - 1504
P.A. Academic Standards:
1.6 Listening and Speaking
3.3 Biological Sciences
9.1 Production and Exhibition of Visual Arts
9.2 Historical and Cultural Contexts
9.4 Aesthetic Response
Goal:
Students will create a Bosched creature by combining at least three different animals; one for the head, another animals body, and a third animals legs. These parts do not need to be animals, students are free to use their creativity and use any inanimate object they would like.
Objectives: Students will:
1. Learn about Surrealism and Hieronymus Bosch.
2. Understand characteristics of certain animals.
3. Enhance their sculpting skills.
4. Remember and apply knowledge learned in previous classes.
5. Design an original creature from at least three real or fantastical animals, or inanimate an object.
Requirements:
Students will design an original creature from at least three real or fantasy creature, or any other inanimate object, using the ideas of Surrealism and Bosch’s fantastical creatures for inspiration.
Resource Materials/Visual Aids:
- Teaching board with exemplars of the project and of artwork by Bosch and
other Surrealists.
- Samples of details of Bosch’s work
- Pictures of animals for reference and inspiration when sculpting their own animal parts.
- Planning worksheet to be filled out before students begin working in clay: they must
first decide which three to five animals or objects with which they wish to work.


Materials:
- Clay (if you use Craolya’s Model Magic you do not need water or to glaze them)
- Pencil
- Clay tools
- Small cups of water
- Tabletop protector
- Small piece of heavier weight paper or cardboard (to place each finished piece)
- Glaze
Teacher Preparation: Teacher will:
• Research Hieronymus Bosch and find examples of his work.
• Research Surrealism and find examples of artwork.
• Collect samples and books of animals for the students to use as reference and inspiration.
• Make a planning handout for the students to fill out before beginning working in clay.
• Create exemplars and teaching board.
Introduction to Lesson:
Teacher will introduce the students to Hieronymus Bosch and show examples of his work. The students will be asked to compare Bosch’s painting to those of the Surrealists. The teacher will remind the students that with Surrealism the artists use ordinary objects and put them in a different order or next to other familiar objects that do not match in order to give it a new perspective. Teacher should then go over a few clay modeling techniques.
 Here are a few examples of my own Bosched Creatures
Directions:
DAY 1
1. After introduction to the lesson, the teacher will go over a few techniques for making basic forms in clay.
2. Fill out worksheet, selecting the animal parts you wish to mix up.
3. Using clay, create the head or top of your creature. Remember you have a certain amount of clay, so divide clay into sections based on how much clay you think each part will need. Make sure you accurately depict the features that make this animal or object unique and or recognizable (i.e., ears, nose, trunk, teeth).
4. Using clay create the body or middle of your creature. You may include the arms and or tail if applicable, or you may choose another animal to represent each of these parts.
5. Using clay, create the legs/feet/fins of the your creature.
6. Attach the legs/feet/fins to the body/middle.
7. Finally attach the head/top to your creature.
8. Make sure the parts are securely attached. Clean area around the attachments.
9. Place creature on the small piece of paper or cardboard. REMEMBER TO WRITE NAMES ON PAPER.
DAY 2
1. Teacher will go over glaze techniques and the Do’s and Don’ts of glazing.
2. Select desired glaze(s) for your creature and glaze.


Closure:
Students will place their creature on the small paper or cardboard given out in the beginning of class and carefully carry it to the designated safe area to dry. Students will then clean up their work areas.
Critique/Evaluation/Assessment:
If there is time after clean-up, students may walk by the finished creatures. Once the creatures are completely dry and fired, students will be able to show the class their work and discuss decisions made and final outcomes.
Extensions:
Write a story about your animal. What special powers does he or she have with all of its mixed up features? Where do he or she live? Create a habitat for your animal.
Time Allotment:
DAY 1
Introduction: 15 minutes
Work Time: 25 minutes
Closure/Discussion: 5 minutes
DAY 2
Introduction: 15 minutes
Work Time: 25 minutes
Closure/Discussion: 5 minutes
Vocabulary:
Hieronymus Bosch – An innovative painter in his day, and even today, known for his paintings of the torments of human life, death, and sin.
Juxtaposition – The position of objects, colors, or shapes next to or near (side by side) another to create meaning within the viewer’s mind.
Middle Ages – Commonly dated from the fall of the Western Roman Empire in the 5th century to the beginning of the Early Modern Period in the 16th century.
Realism - A style of painting that depicts what the eye can see.
Surrealism – An artistic movement that began in the early 1920’s, in which the art features the elements of surprise, unexpected juxtapositions, and non sequiturs.
 Hieronymus Bosch, Outside panels of The Garden of Earthly Delights, 1503 - 1504 Triptych closed.
Safety Concerns:
Students must be careful if working with clay tools, some have sharp points. Clay tools are not toys and should only be used in appropriate manner with the clay.
Bibliography/References:
Campbell, J.W. (2000). The essential Hieronymus Bosch. New York, NY: The
Wonderland Press.
Descharnes, R. & Neret, G. (2002) Salvador Dali 1904 – 1989, The paintings. Part I
1904 – 1946. New York: Taschen
Brief History:

Hieronymus Bosch (1453 – 1516) was a painter who leaves behind more questions than paintings. Bosch introduced a new vision to painting – not a new style, or technique, or school of art – but a new vision.
Bosch was born and died in what is now the Netherlands, during the Middle Ages and a volatile time for Christianity. In some ways, Bosch was an old-fashioned painter, making use of the standard religious themes of his day, but only after removing everything in them that smacked of the predictable. He was a true innovator who would continue to inspire the geniuses of the centuries to come. Some historians see Bosch as a proto-type medieval Surrealist, and parallels are often made with the 20th century Spanish painter Salvador Dali.
 Hieronymus Bosch, The Garden of Earthly Delights, 1503 - 1504
1.6 Listening and Speaking
3.3 Biological Sciences
9.1 Production and Exhibition of Visual Arts
9.2 Historical and Cultural Contexts
9.4 Aesthetic Response
Goal:
Students will create a Bosched creature by combining at least three different animals; one for the head, another animals body, and a third animals legs. These parts do not need to be animals, students are free to use their creativity and use any inanimate object they would like.
Objectives: Students will:
1. Learn about Surrealism and Hieronymus Bosch.
2. Understand characteristics of certain animals.
3. Enhance their sculpting skills.
4. Remember and apply knowledge learned in previous classes.
5. Design an original creature from at least three real or fantastical animals, or inanimate an object.
Requirements:
Students will design an original creature from at least three real or fantasy creature, or any other inanimate object, using the ideas of Surrealism and Bosch’s fantastical creatures for inspiration.
Resource Materials/Visual Aids:
- Teaching board with exemplars of the project and of artwork by Bosch and
other Surrealists.
- Samples of details of Bosch’s work
- Pictures of animals for reference and inspiration when sculpting their own animal parts.
- Planning worksheet to be filled out before students begin working in clay: they must
first decide which three to five animals or objects with which they wish to work.
Thumbnails from Bosch's Garden of Earthly Delights.


Materials:
- Clay (if you use Craolya’s Model Magic you do not need water or to glaze them)
- Pencil
- Clay tools
- Small cups of water
- Tabletop protector
- Small piece of heavier weight paper or cardboard (to place each finished piece)
- Glaze
Teacher Preparation: Teacher will:
• Research Hieronymus Bosch and find examples of his work.
• Research Surrealism and find examples of artwork.
• Collect samples and books of animals for the students to use as reference and inspiration.
• Make a planning handout for the students to fill out before beginning working in clay.
• Create exemplars and teaching board.
Introduction to Lesson:
Teacher will introduce the students to Hieronymus Bosch and show examples of his work. The students will be asked to compare Bosch’s painting to those of the Surrealists. The teacher will remind the students that with Surrealism the artists use ordinary objects and put them in a different order or next to other familiar objects that do not match in order to give it a new perspective. Teacher should then go over a few clay modeling techniques.
 Here are a few examples of my own Bosched Creatures
DAY 1
1. After introduction to the lesson, the teacher will go over a few techniques for making basic forms in clay.
2. Fill out worksheet, selecting the animal parts you wish to mix up.
3. Using clay, create the head or top of your creature. Remember you have a certain amount of clay, so divide clay into sections based on how much clay you think each part will need. Make sure you accurately depict the features that make this animal or object unique and or recognizable (i.e., ears, nose, trunk, teeth).
4. Using clay create the body or middle of your creature. You may include the arms and or tail if applicable, or you may choose another animal to represent each of these parts.
5. Using clay, create the legs/feet/fins of the your creature.
6. Attach the legs/feet/fins to the body/middle.
7. Finally attach the head/top to your creature.
8. Make sure the parts are securely attached. Clean area around the attachments.
9. Place creature on the small piece of paper or cardboard. REMEMBER TO WRITE NAMES ON PAPER.
DAY 2
1. Teacher will go over glaze techniques and the Do’s and Don’ts of glazing.
2. Select desired glaze(s) for your creature and glaze.


Closure:
Students will place their creature on the small paper or cardboard given out in the beginning of class and carefully carry it to the designated safe area to dry. Students will then clean up their work areas.
Critique/Evaluation/Assessment:
If there is time after clean-up, students may walk by the finished creatures. Once the creatures are completely dry and fired, students will be able to show the class their work and discuss decisions made and final outcomes.
Extensions:
Write a story about your animal. What special powers does he or she have with all of its mixed up features? Where do he or she live? Create a habitat for your animal.
Time Allotment:
DAY 1
Introduction: 15 minutes
Work Time: 25 minutes
Closure/Discussion: 5 minutes
DAY 2
Introduction: 15 minutes
Work Time: 25 minutes
Closure/Discussion: 5 minutes
Vocabulary:
Hieronymus Bosch – An innovative painter in his day, and even today, known for his paintings of the torments of human life, death, and sin.
Juxtaposition – The position of objects, colors, or shapes next to or near (side by side) another to create meaning within the viewer’s mind.
Middle Ages – Commonly dated from the fall of the Western Roman Empire in the 5th century to the beginning of the Early Modern Period in the 16th century.
Realism - A style of painting that depicts what the eye can see.
Surrealism – An artistic movement that began in the early 1920’s, in which the art features the elements of surprise, unexpected juxtapositions, and non sequiturs.
 Hieronymus Bosch, Outside panels of The Garden of Earthly Delights, 1503 - 1504 Triptych closed.
Students must be careful if working with clay tools, some have sharp points. Clay tools are not toys and should only be used in appropriate manner with the clay.
Bibliography/References:
Campbell, J.W. (2000). The essential Hieronymus Bosch. New York, NY: The
Wonderland Press.
Descharnes, R. & Neret, G. (2002) Salvador Dali 1904 – 1989, The paintings. Part I
1904 – 1946. New York: Taschen
Subscribe to:
Posts (Atom)
